Are you building a house on land and assuming construction starts when the foundation is poured? Many people building a house on land overlook the critical work that happens before concrete ever arrives. Building a home on land involves far more than design and materials. It begins with site preparation that determines whether your project stays on schedule or runs into costly delays.
Industry data shows site work can take over six percent of your total construction budget, yet it often receives the least attention during planning. Even more concerning, unexpected soil or drainage problems can increase preparation costs by up to twenty percent when testing is skipped. This creates serious risks for anyone managing a land and build project without a clear plan.
In this blog post, we will talk about how to plan your site work timeline, what do you need to build a house on land, and how to avoid delays that disrupt your entire build.
Daniel Dean | 30+ Years of Dirt Work and Land Clearing in Southeast Texas
Pre-Construction Planning: What Must Be Finalized Before Site Work Begins
Before any machine touches your property, three things need to be locked in: a legal survey, soil data, and approved permits. Skipping or rushing any of them is the single most common reason site work stalls.
Surveys
- A boundary survey confirms your property lines and flags easements, setbacks, or encroachments that affect where your house can legally sit.
- A topographic survey maps elevation changes and drainage flow, which directly informs your grading and foundation design.
Both are required by most local permitting offices before they will issue a building permit.
Soil Testing
In areas like Conroe, Magnolia, and much of the greater Houston region, we frequently encounter expansive clay soil. This type of soil shrinks and swells significantly with moisture changes, which can crack slabs and shift foundations if the right precautions are not taken at the design stage. A geotechnical report tells you exactly what you are dealing with before you commit to a foundation type. A basic soil test runs $500 to $1,000, but catching a clay or high-water-table problem here is far cheaper than addressing it after footings are poured.
Permit Acquisition
Depending on your county, permits can take anywhere from two weeks to four months. The common permit types you will need include:
- Zoning or land use permit
- Grading and erosion control permit
- Building permit
- Utility connection permits (water, sewer or septic, electrical)
File early and file everything at once if your jurisdiction allows it. Montgomery County and Harris County each have their own review timelines, and we factor those in when scheduling any new job in our service area.
Site Layout Plan
Use this pre-construction window to finalize your site layout plan. This document shows where the house sits on the lot, where the driveway connects to the road, how stormwater exits the property, and where utilities enter. Your builder, civil engineer, and subcontractors all work from this plan. If it changes after site work starts, you pay for the changes twice.
Phase 1 Timeline: Land Clearing, Access, and Initial Setup
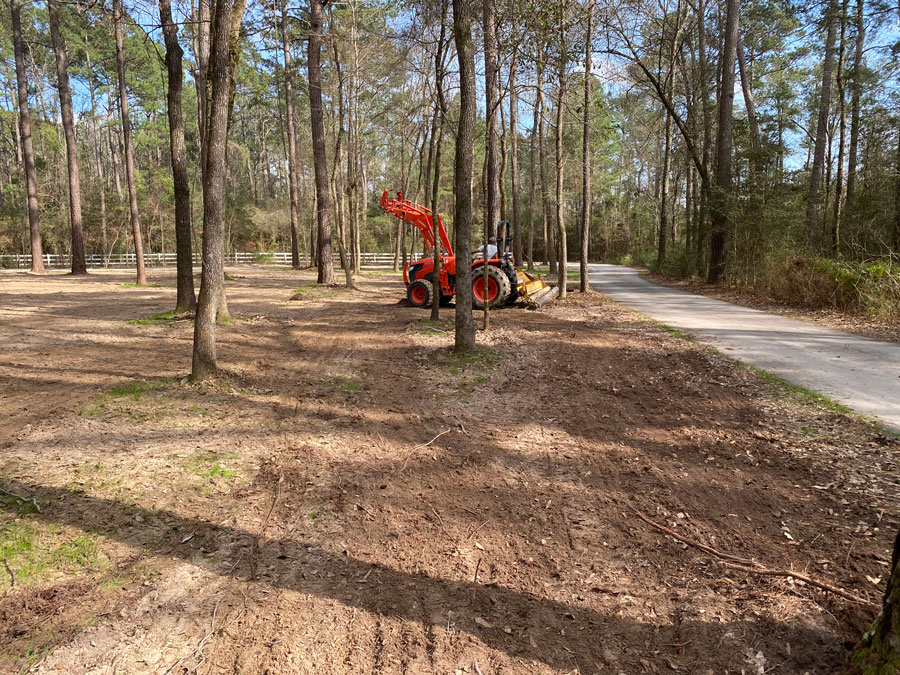
Once permits are in hand, physical site work begins with clearing. This phase covers tree removal, brush clearing, stump grinding, and removing any existing structures or debris. We handle this entirely with our own heavy equipment, which matters more than most homeowners realize.
A residential crew with a skid steer and a rented chipper moves very differently than a full excavation outfit with dedicated forestry mulchers and hydraulic thumb excavators built for demolition and debris handling. We fully remove all material from the site rather than grinding and spreading, which keeps the soil profile clean for grading.
| Site Condition | Estimated Clearing Time |
| Light brush, minimal trees | 1 to 2 days |
| Moderate tree coverage, standard lot | 2 to 5 days |
| Heavy woods or rocky terrain | 2 to 3 weeks |
Immediately after clearing, the access road or driveway base is roughed in. This is not cosmetic. It allows heavy equipment to reach the building site without tearing up the lot, and it needs to be stable enough to support concrete trucks and cranes later in the build.
Temporary utilities are set up in this phase as well:
- A temporary electrical panel gives contractors power for tools and site lighting.
- If your site is remote, temporary water service or water storage may also be needed.
- These connections require their own inspections and permits, which should already be in process.
Once your site is cleared and access is roughed in, you will also need to plan where materials and equipment are staged during construction. A disorganized storage area slows crews down and increases safety risks. Our Laydown Yard Setup Checklist covers how to zone and prepare a laydown area for any construction project, including ground stabilization, traffic flow, and material organization.
Here in Southeast Texas, late spring and early fall can bring heavy rain systems that saturate the ground fast. We schedule clearing phases with that in mind, typically building in buffer weeks around our historically wet months.
Wet ground does not just slow equipment; it creates ruts that must be corrected before grading can begin, adding time and cost. That is not a textbook warning for us. It is something we actively schedule around on every job. Build at least one to two weeks of buffer into this phase.
Phase 2 Timeline: Grading, Excavation, and Drainage Planning
Rough grading reshapes your lot to match the approved site plan. The goal is a stable, level building pad with positive drainage sloping away from where the foundation will sit. This must be completed before excavation begins.
Excavation follows, digging out the area for your foundation. Duration varies by foundation type:
- Slab on flat ground: 1 to 2 days
- Crawl space: 3 to 5 days
- Full basement on sloped or rocky terrain: 1 to 2 weeks, potentially requiring blasting
After excavation, soil compaction is performed in lifts before footings are poured. Most jurisdictions require a compaction test report before allowing foundation work to proceed. With the clay-heavy soils common throughout Montgomery County, compaction protocol is not something to cut corners on. We have seen foundations settle unevenly on improperly compacted clay pads, and the repair cost dwarfs anything saved by rushing the compaction phase.
Drainage is the critical milestone in this phase. We specialize in redirecting water using swales, berms, or underground pipe systems to keep it moving away from your new foundation. Your site plan must specify how stormwater exits the property before grading ends. Options include the following:
- Swales and berms to redirect surface water
- Underground drainage pipes tied to a storm system
- Retention or detention areas for larger properties
Poor drainage decisions made here do not just create wet basements. They cause soil erosion under foundations, damage to neighboring properties, and costly remediation years later. If your property includes a pond or water feature nearby, runoff and sediment from your construction site can affect its long-term health.
Our pond maintenance services frequency guide explains how to stay ahead of water management issues once construction wraps up.This phase typically runs one to three weeks depending on site conditions, soil type, and weather.
Phase 3 Timeline: Utility Installation and Final Site Prep
With the building pad shaped and drainage resolved, utility trenches are dug. Each utility type requires its own trench, contractor, and inspection.
The recommended sequencing is:
- Sewer or septic first — requires specific slope grades and, for septic systems, a location already approved through a percolation test.
- Water lines second — coordinated around sewer depth and routing.
- Electrical conduit third — typically the most flexible in terms of routing adjustments.
- Natural gas last — if applicable, often installed after other utilities are in place.
Do not backfill any trench until the corresponding inspection is passed and documented. Municipalities require open trenches for visual confirmation before sign-off. In our experience working across Harris, Montgomery, and Waller counties, inspection scheduling windows vary significantly. We always account for that lag when building out utility timelines for our clients.
Final grading happens after utilities are buried. This sets the finished ground elevation around the house perimeter, establishes positive drainage away from the foundation, and prepares the pad for concrete work. Fine grading tolerances are tight, typically within a tenth of a foot of design elevation. We leave the property clean and ready for the foundation crew, which is a standard we hold ourselves to on every job regardless of project size.
Before foundation work begins, most jurisdictions require a final site inspection confirming that grading, drainage, and utility connections all meet plan specifications. This is your last checkpoint before vertical construction starts.
How to Build a Realistic Site Work Timeline (Avoid Delays and Cost Overruns)
The biggest scheduling mistake is treating each phase as independent. Some tasks can overlap; others cannot.
Tasks that can run in parallel:
- Clearing and permit finalization
- Rough grading and utility permit applications
- Trench digging for multiple utilities when different crews work separate areas
Tasks that must wait on a prior completion:
- Grading cannot start until surveys are complete
- Excavation cannot start until permits are approved
- Trenches cannot be backfilled until inspections pass
- Foundation work cannot begin until final grading is signed off
The three most common delay factors, and how to handle them:
| Delay Factor | How to Mitigate |
| Weather | Build 1 to 2 week buffers into each outdoor phase |
| Unexpected soil conditions | Order soil testing before permitting, not after |
| Permit delays | Apply early, respond to agency requests within 24 to 48 hours |
Working with a contractor who owns their equipment and manages site work directly, rather than subcontracting everything out, is one of the most effective ways to keep a timeline tight. When we show up to a job, we are not waiting on a rental yard or coordinating with a third-party hauler.
That self-sufficiency is something we have built deliberately over 30 years because our clients cannot afford to lose weeks to scheduling gaps. If you are managing subcontractors yourself, budget a minimum 20 percent time buffer per phase and a 10 to 15 percent cost contingency in your site work budget.
FAQs
What is the cheapest way to build a house on my land?
The most cost-effective approach to building a house on land is to choose a simple design, minimize site work complexity, and build on stable, well-prepared soil. Controlling costs early through proper grading, drainage, and planning prevents expensive fixes later.
What are common mistakes to avoid building a house?
Many people building a home on land skip soil testing, rush permits, or ignore drainage planning, which leads to structural and budget issues. Poor site preparation and unrealistic timelines are the most common causes of delays and long-term damage.
What is the smallest plot of land you can build a house on?
The minimum lot size depends on local zoning laws, setbacks, and utility access requirements in your area. Always check county or city regulations before starting a land and build project to ensure your property qualifies for construction.
Final Thoughts on Building a House on Land
Building a house on land requires more than a vision and a set of plans. It requires a clear, well-sequenced site work timeline that begins with surveys, soil testing, and permits, then moves through clearing, grading, drainage, and utility installation without gaps. When each phase follows the correct order, you reduce delays, control costs, and create a stable foundation for everything that follows. When steps are rushed or skipped, problems build quickly and become expensive to fix.
If you are planning a land and build project, the next step is to work with a team that understands how to manage site preparation from start to finish. For expert help with land clearing, grading, drainage, and full site work services, visit the Daniel Dean contact page to get in touch. Our team is ready to answer your questions and help you move forward with confidence.